


Note - There are lots of different ways to decant, this is what works for me and it’s what I recommend.
Prepare
You should absolutely do this on over a drop cloth, outside, or someplace you really don’t mind getting paint all on. If you do it right, you won’t spill a drop, but it’s very easy to cause a mess or literally spill a single drop.
In addition to your spray bottle, you’re going to need a regular ol’ paint jar to put the paint in. To get the paint from the bottle to the jar, you need a paint dropper or a plastic straw. Depending on the fit you should may also need some tape or reusable putty. You’re also going to need some plastic wrap (i.e. Saran Wrap). Paper towels are good to have on hand as well!
From the Can to the Jar
The key to the whole process is getting the paint from the spray can to the jar in a controlled manner. I have some bendy straws that are a perfect width to fit around the spray nozzle of a Tamiya can that will guide the paint right out and to my jar. You can also use a paint dropper as they’re often tapered and can be cut at the right diameter for your jar (make sure to cut off the dropper end).
If there’s any give on the tube, tape it up or use some putty to hold it in place and seal any gaps. Failure to do so will cause the tube to shoot out and paint to spray everywhere.
The Process
Before you begin, take that plastic wrap and cover up the top of the jar. You want it on tight enough that it’ll stay in place. Then, taking your tube/straw/dropper, poke a hole into the top so you can insert the other end into the jar. This will keep the paint inside should there be any back spray issues. You do not want the jar to be airtight, gasses will need to escape during this process (more on that in a bit).

Once everything has been set up, shake up your can, insert the tube through the hole in the plastic, and spray away. If everything is in order the paint will pass through the tube and into the jar safely.
DO NOT fill the jar past 80% and DO NOT submerge the tube into the paint itself. You know what happens when you blow bubbles into your milk? Now imagine that with the force of gas escaping a spray can…. paint everywhere.
The Wait
Once you’ve filled the jar up with enough paint, carefully remove the tube and clean it out. Most spray cans are lacquers so a bit of lacquer thinner should do the job, check with the manufacturer first just to be sure. There will be a bit of paint in the tube still so watch for drops.
Now back to the paint filled jar. Notice anything weird about it? Yes, it should be bubbly and yes, it should be cold to touch. There’s some really cool science going on here. The paint in the spray can is mixed with some propellants that evaporate at room temperature. The bubbling you see are those propellants literally boiling off. In addition, the paint is considerably cooler, partially because of heat lost during its transfer to a low pressure environment.
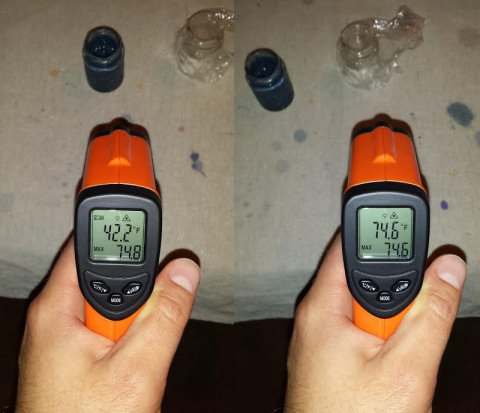
If you cap the jar now pressure will build up causing bad things to happen. So just let it sit for a couple hours at least. I generally leave my jars sitting open overnight just to give it as much time as possible to degas.
Now you’re ready to spray! I’ve never had to thin paints from Tamiya spray cans but other brands, and other air brushes, may behave differently. Treat it like any other paint by thinning if you need to and clean with the appropriate paint type.


