


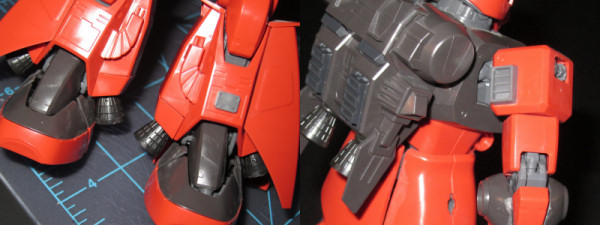
One of the easiest ways to add unique details to your project is through the use of option parts. Option parts are a generic term for accessories ranging from thrusters, hatches, and other details to extra and unique weapons. Kotobukiya makes the most options parts under their Modeling Support Goods (M.S.G.) line (HLJ / Hobby Search). Bandai has their own line called Builder’s Parts (HLJ / Gundam Planet).
Option kits featuring weapons or stands come with instructions and can be built like any other kit. Kotobukiya’s weapons generally come with standard attach points that allow them to be easily utilized with their original models. The fun stuff is the random patches, panels, rivets, thrusters, spikes, lenses and others armament details. These can be glued to your kit in any number of ways to really change how a kit looks. Where you add them, how many you add, it’s all up to you. Painting is generally recommended but if your kit already has a bunch of gray components you might be able to add some option parts without having to paint.
Adding Simple Pieces
Most external detailing pieces can be added simply by gluing them to your kit. Start by removing the option piece from the runner and cleaning it up (i.e. sanding). For glue I recommend some plastic welding agents. These will allow for a quick and strong fix. Other modeling glues will work, as will super glue, but you run the risk of fogging with some brands.
The key is to add a small amount of glue in the middle of the piece and adding a bit more toward the edges. Part of the reason I like plastic weld is that it’s thinner and easier to apply a light coat. What you don’t want to do is apply too much and have it seep out the edges. Keep in mind that the stronger the glue the more difficult it will be to clean up your kit should you apply too much. It’s always preferable to apply to little and have to reattach the piece later.
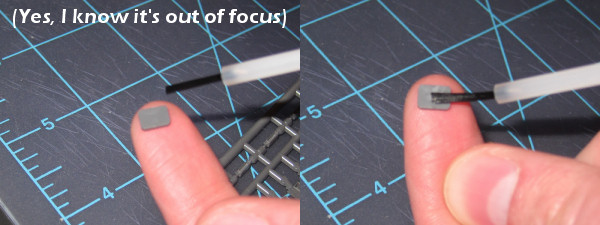
Once you apply the piece hold it until the glue starts to cure and the piece stays in place. Right before this is a small window in which you can wiggle it around a bit and fix any alignment issues. Once it’s all set leave the piece alone and allow it to fully set.
Most option pieces have flat backs which makes applying them incredibly easily to a flat surface. Curved or odd surfaces will require more attention.
It’s also important to plan on placement while the kit is fully constructed. If you look at individual pieces you’re likely to pull a Falldog and place them they won’t be seen or where they’ll get in the way of another part.
Customization
There’s so much to talk about here I don’t know where to start, or where to end. There are so many things to do and so many different ways to do it. Here are some basics…
- To affix an option piece to a curved surface use some sandpaper to curve the back of the piece until they line up together. It won’t work in all instances but the process lends itself better to easier to handle option pieces and when affixed to something with simple curves
- Some components, like duct nozzles, can have a thick back causing them to stick out quite a bit. The easy fix is to stand down the rear until you like the profile. More adventurous modelers can actually cut a whole in their kit and see about setting it in the piece itself. Depending how clean you are this method may necessitate some putty to clean up the edge between the pieces.